Spinal Seating Modules
Conducting the MAT
The pelvis is the ‘foundation stone’ in sitting as it supports the person’s body weight above it. Pelvic positioning and stability affect the alignment of the head, trunk, upper and lower extremities. Asymmetrical pelvic alignment may increase risk of pressure injury development, so the pelvis is usually assessed first in the MAT.
The MAT is usually conducted in 3 phases:
Postural assessment in
existing seating system
Assessment
in supine
Assessment
in sitting
Postural assessment in existing seating system
 Helpful Equipment:
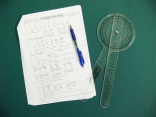
- Refer to page 1 of the Basic MAT form
- Camera and sticker dots
- Goniometer (pictured right)
Record the client's posture in the current seating and mobility system, including photos. Make sure the client is in their "usual posture". Note how this posture influences pressure distribution, and how the seating system influences the current posture.
The process should include assessment of:
Postural Presentations | Options and Considerations |
|---|---|
Pelvic tilt | Neutral, posterior, or anterior tilt |
Pelvic obliquity | Level, left side or right side lowered and by how much, e.g. right lowered by 25mm (1 inch) |
Pelvic rotation | One ASIS is forward of the other, e.g. left forward rotation by 25mm (1 inch) |
Spinal curves | Flattening or exaggeration of lordosis / kyphosis at the neck, thorax and lumbar areas |
Symmetry in the trunk | The sternum or spinal process are perpendicular to ASIS or PSIS with no lateral deviation/scoliosis, and the shoulders are level |
Trunk rotation | The shoulder and the pelvis are horizontally rotated against each other |
Symmetry in head and neck position | Head position is often driven by visual field alignment |
Upper and lower extremities | Positioned and supported to facilitate neutral alignment of the spine and pelvis |
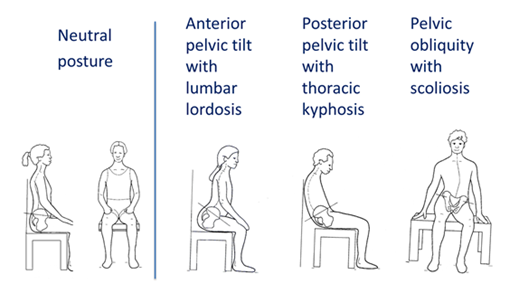
Figure 2: Common postural presentations.
Original image used with permission from Zollar, J.A.1 . Adapted by Turnbull, C. 2016.
Consider functional tasks such as transfer, propulsion and reaching may alter the client’s assessed posture over time. Observing the client propelling a manual wheelchair or driving the power wheelchair outdoor would also be useful as part of the assessment process.
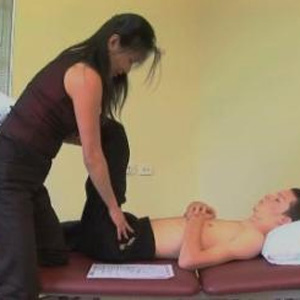
Assessment in supine
Supine assessment provides gravity-eliminated information. It should be conducted on a padded firm surface such as a plinth as it is difficult to assess spinal curves on soft support surfaces, (e.g. bedding) or to manipulate the pelvis and trunk positions when assessing joint flexibility and skeletal alignment.
Joint flexibility can be described as:
- Flexible: the range of motion in the joint is easily manipulated to assume the desired posture/position. Seating intervention aims to promote neutral positioning and prevent deformities.
- Corrects with effort/partially flexible: the range of motion in the joint is manipulated with resistance, but will move towards the neutral position when force is applied.
- Fixed: the joint has restricted range of motion and will not assume a neutral posture. When force is applied to the joint in an effort to achieve a neutral position the neighbouring joints will move instead to compensate.
While the client is lying on a plinth, the following assessments can also be conducted:
- Skin check if relevant
- Body measurement (Module 4) in supine/side-lying if measurement in sitting is not feasible e.g. clients who have sitting-acquired pressure injuries or who are dependent sitters.
- Assessment and measurement of the current system when the client is not sitting in it (Module 5).
Other considerations to note:
- If a plinth is not available, a full length transfer board on a soft bed can be used for a short duration. Remove the client as soon as possible once supine assessment is completed to minimise risk of pressure injury development
- Clients who have open pressure injuries in contact with supine support surface should not be placed on a hard support surface. Supine assessment should only commence after such wounds have healed
- A urinary catheter should be emptied prior to supine assessment. Ensure the catheter tube is not pulled or blocked while performing lower limb flexibility assessment. Monitor the client for signs of autonomic dysreflexia
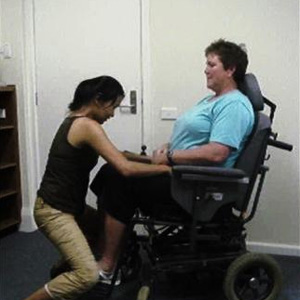
Assessment in sitting
The sitting MAT should be conducted on a padded firm surface such as a plinth or a dining room chair. Feet should be not hanging, but supported on the floor or a foot block
- ‘Hands-free sitters’ and ‘hand-dependent sitters’ should be assessed sitting up with the back of the knees against the edge of a plinth, or sitting fully back in the chair.
- If the client is a dependant sitter, two clinicians may be necessary to manually support the pelvis and trunk for the sitting assessment and simulation task. It is advisable that this assessment task should be conducted by experienced clinicians who work with this group of clientele.
Note
Clients who have sitting-acquired pressure injuries should not sit on a firm surface. Sitting assessment can commence only when the wounds are healed.
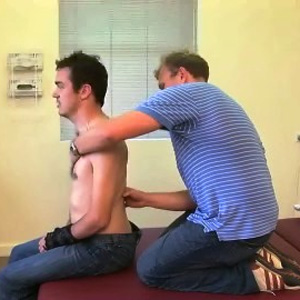
The sitting phase of the MAT aims to evaluate the effect of gravity on posture, and trunk flexibility. By comparing joint flexibility recorded in supine assessment, with the posture presentation in sitting assessment, the clinician can then manually manipulate the trunk position and/or place supports under the pelvis to improve skeletal alignment. This is referred as simulation task which forms the basis of seating intervention plan.
Generally, seating intervention should aim to:
- Correct a flexible or semi flexible posture towards neutral position (following the supine MAT recording) and prevent development of postural deformities. Correcting posture requires an applied force to achieve neutral posture; localised pressures created by these applied forces should be monitored. Do not correct beyond the range of motion identified in the supine assessment. Postural correction may be achieved incrementally; adjustment and progressive intervention is advisable.
- Accommodate a fixed deformity identified in the supine phase of the MAT. Seating intervention aims to accommodate fixed deformities and prevent further development. Never simulate beyond the range of motion established in the supine assessment
- At times, medical intervention, surgical and orthotic options, or ‘24-hour positioning’ may be needed for those with postural difficulties such as severe or fixed deformity.

Figure 3: Spectrum of joint flexibility/fixity (See Module 7 for more details)
While the client is sitting on the plinth, other observations and assessments may include:
- An assessment of balance and reach in sitting
- Noting any difficulty in breathing as affected by gravity
- Assessing the influence of head and neck position on vision
- Observation of any spasm or reflex patterns during transfer and in sitting that may affect posture
- Body measurement (Module 4).
Case study
The following case study follows the process of the MAT. Read through the information revealed with each phase of the MAT and consider the implications of each with respect to achieving a good sitting posture. What other considerations are important when thinking about configuring the client’s seating?
A client with a T4 incomplete spinal cord injury was presenting in his wheelchair with recurrent stage 2 pressure injury on his right ischial tuberosity. He was sitting in his 5 year old manual wheelchair and a mildly contoured foam cushion which appeared to be worn out.
Postural assessment sitting in his wheelchair revealed:
- Slight posterior pelvic tilt ( PSIS is lower than ASIS by 25mm (1 inch))
- Pelvic obliquity (right lowered by ~ 50mm (2 inches))
- Hips were position off centred to the left by ~ 25mm (1inch) outside the seat rail (he lost his rigid side guard a few years ago)
- Scoliosis with apex at T8
The supine assessment revealed:
- Neutral pelvic tilt
- Flexible pelvic obliquity – easy to move to left or right side
- No scoliosis visually noted (when clinician levelled his shoulders against the pelvis, the sternum is perpendicular to the shoulders and midline of pelvis)
The sitting assessment revealed:
- Required his arms to push on the plinth for support
- Sat with posterior pelvic tilt, ~ 25mm (1 inch) left obliquity and scoliosis noted
- Also noted that there were asymmetrical tissue bulks between the left and right thigh, with more atrophy noted on the right side
Simulation tasks may include:
- Placing a foam wedge under the left side of the pelvis to check if the pelvic obliquity is correctable and reduces scoliosis
- Providing posterior support with the clinician’s hands behind the client’s PSISs or lumbar spine to reduce posterior pelvic tilt
- Assessing if there is an improvement in posture and balance with adjustment to posterior support
Providing posterior and lateral support by using the clinician’s hands at the apex of the scoliosis if required
References
- Zollars, J.A., (Illus. Knezevich, J.), 1996. Special seating: An illustrated guide. Otto Bock Orthopaedic Indus., Inc., pp71-75.