Pleural tap or thoracentesis
Consent
Explain the procedure including relevant risks (pneumothorax, bleeding, infection)
Obtain and document written consent where possible
Online patient information leaflet on pleural effusion may be of use
Indications
Diagnostic tap:
unilateral pleural effusion
bilateral pleural effusions where aetiology unclear (not a presumed simple transudate from common causes)
Therapeutic thoracentesis:
symptomatic pleural effusions
failed initial medical management (diuresis, treatment of underlying cause)
Contraindications
Local skin infection
Uncooperative patient (unless a duty of care established and underlying delirium)
Uncorrected bleeding diathesis (in particular low platelets)
Relative contraindication with bullous lung disease and small effusions
Medications
Lignocaine 1% or 2%
Procedural sedation may be required following discussion with ED consultant or senior registrar – follow local procedures
Equipment
Pre-packaged thoracentesis kits are available commercially – become familiar with the devices available at you institution. To see equipment options click here.
Chlorhexidine solution
Sterile gauze
Sterile drape
Sterile gloves
5 or 10ml syringe for anaesthetic injection
22G needle for injection of local anaesthetic
18G cannula for thoracentesis
50ml syringe
3-way tap and extension set
Yellow specimen containers
Kidney dish or other pleural fluid collection vessel
Sterile occlusive dressing
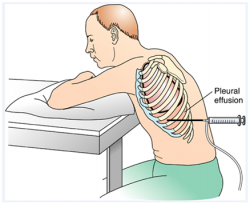
Positioning of patient
Sitting position on edge of bed leaning forward with his or her arms resting on a bedside table, pillow under arms as a comfort measure
Procedure
Written consent should be documented where possible
Perform time out and confirm correct location for procedure, correct patient, correct procedure, correct side
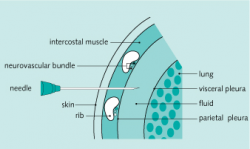
Mark site for needle aspiration using ultrasound guidance on the posterolateral aspect of chest wall unless time critical and/or life saving and ultrasound unavailable (clinical marking of effusion - percuss upper border of effusion and mark area 1-2 intercostal spaces below this)
Ensure the proposed site is directly over a palpable intercostal space and above the level of the diaphragm (no lower than 8th intercostal space)
Adapted from: Oxygenation lecture: Thoracentesis [internet]. Studyblue flashcards [cited 6 May 2014].
Available from: http://www.studyblue.com/notes/note/n/oxygenation-lecture/deck/5471265
- Anaesthetise the epidermis overlying the superior edge of the rib that lies below the selected intercostal space using 1% or 2% lignocaine and a 22G needle
- Now insert that same needle perpendicular to the skin until you hit the rib and then ‘walk’ it along the superior edge of the rib, alternately injecting anaesthetic and pulling back on the plunger every 2 or 3mm to rule out intravascular placement and to check for proper intrapleural placement.
NOTE: The intercostal neurovascular bundle runs along the inferior aspect of a rib so ensure that your needle avoids these structures
Source: Practical procedure: Pleural tap [internet]. Student Consult [cited 6 May 2014].
Available from: http://www.studentconsult.com/spleen/procedures/pleuraltap.cfm
Once pleural fluid is aspirated, stop advancing the needle and inject additional lignocaine to anaesthetise the highly sensitive parietal pleura. Note the depth of penetration before withdrawing the needle.
Attach an 18G cannula to a syringe and advance the needle along in the same plane as the local anaesthetic was injected, ensuring that you continuously pull back on the plunger
Once you obtain pleural fluid then remove the needle leaving the cannula in place
REMEMBER: Cover the open hub of the catheter with a finger to prevent the entry of air into the pleural cavity
Attach a 50ml syringe with a 3 way tap to the catheter hub and open the tap to the patient and syringe to aspirate 50ml of pleural fluid for diagnostic analysis
Close the 3 way tap to the patient as you distribute the fluid into relevant specimen containers
If performing therapeutic thoracentesis, then attach the extension set to the third port with the free end in a container to collect the pleural fluid
Remove fluid in the following fashion with the syringe re-attached to the 3 way tap:
Open tap to patient and syringe
Withdraw 50ml fluid
Close tap to patient and ensure it is open to syringe and extension tubing
Empty the syringe whilst it is still attached by pushing the plunger and re-routing the fluid down the extension set into the container
Repeat above steps
Do not remove more than 1500ml fluid due to risk of re-expansion oedema
When procedure is complete remove catheter with patient at end expiration (i.e. ask the the patient to take deep breath in, blow fully out and then hold their breath, then remove the cannula during the breath hold) and cover site with an occlusive dressing
Send fluid for m/c/s, consider cytology, biochemical analysis (pH, amylase, protein/albumin, glucose, LDH). Consider inoculating blood culture bottles with pleural fluid if infection suspected. Consider fungal and viral studies.
Post procedure care
Perform a post aspiration chest x-ray
Provide appropriate analgesia
Monitor for evidence of any complications: pneumothorax, post expansion pulmonary oedema, bleeding, intra-abdominal organ injury (rare), infection (delayed and rare)
Further resources
ACI Video - pleural drain insertion
NEJM video: thoracentesis procedure
Todd W. Thomsen, M.D., Jennifer DeLaPena, M.D., and Gary S. Setnik, M.D. 'Thoracentesis', N Engl J Med 2006; 355:e16 12 October 2006 DOI: 10.1056/NEJMvcm053812.